Top 10 Homemade Bread Recipes
Just close your eyes and picture the smell of baking, homemade bread wafting through your home. Picture cutting into this bread and watching the steam rise from the perfectly baked middle. Seems amazing, right? But, unfortunately, a lot of women are really intimidated by the idea of making their own homemade bread, even though it can be healthier and cheaper. There’s no need to fear, though! We’ve collected 10 AMAZING and easy to make bread recipes for you to try at home. Now stop fantasizing about the perfect loaf of homemade bread and go make some!
1. Rosemary and Oil Bread

1 kg flour (I use white bread flour)
20 g salt (about 1 tablespoon)
10 g instant yeast (or 25 g fresh yeast)
750 ml lukewarm water
olive oil
sliced onion and chopped rosemary for topping
20 g salt (about 1 tablespoon)
10 g instant yeast (or 25 g fresh yeast)
750 ml lukewarm water
olive oil
sliced onion and chopped rosemary for topping
2. Homemade Soft Pita Bread
 1 cup pretty warm water
2 tsp active dry or instant yeast
2 1/2 – 3 cups all-purpose flour
2 tsp salt
1 Tb extra virgin olive oil
3. Almost No-Knead Bread

3 cups (15 ounces) all-purpose flour
1/4 teaspoon instant yeast
1 1/2 teaspoons table salt
3/4 cup (7 ounces) water, at room temperature
1/4 cup (3 ounces) beer
1 tablespoon white vinegar
1/4 teaspoon instant yeast
1 1/2 teaspoons table salt
3/4 cup (7 ounces) water, at room temperature
1/4 cup (3 ounces) beer
1 tablespoon white vinegar
4. Easy Peanut Butter and Jelly Bread
 2 and 1/2 cups unbleached bread flour
2 Tbsp sugar
1/2 tsp salt
1 Tbsp SAF-instant premium yeast
1 tsp Easy Squeezy Soy Liquid Lecithin
1 cup hot/warm water
Peanut butter
Jelly
5. Homemade Bread Loaf

3 Cups all purpose flour (not with sodium)
1 teaspoon sugar
2 1/2 teaspoons salt (bit less than 1 TBS)
1 Tbs. Baking powder *optional
1 Tbs. dry yeast
1 1/2 cups of Luke warm water, more or less as needed (or warm milk)
Oil for greasing the baking pan
1 teaspoon sugar
2 1/2 teaspoons salt (bit less than 1 TBS)
1 Tbs. Baking powder *optional
1 Tbs. dry yeast
1 1/2 cups of Luke warm water, more or less as needed (or warm milk)
Oil for greasing the baking pan
6. Cheesy Garlic Loaf

1 large, thick loaf of crusty bread
8 cloves of crushed garlic
½ teaspoon garlic powder
4 tablespoon regular butter
4 tablespoon good olive oil
1 cup shredded Italian blend cheese
fresh parsley, finely chopped
8 cloves of crushed garlic
½ teaspoon garlic powder
4 tablespoon regular butter
4 tablespoon good olive oil
1 cup shredded Italian blend cheese
fresh parsley, finely chopped
7. Cinnamon Sweet Leaves Bread
 2 3/4 cups plus all-purpose flour
1/4 cup granulated sugar
2 1/4 teaspoons (1 envelope) active dry yeast
1/2 teaspoon salt
2 tablespoons butter
1/3 cup milk
1/4 cup water
2 large eggs, at room temperature
1 teaspoon pure vanilla extract
1 cup granulated sugar
2 teaspoons cinnamon
1/2 teaspoon nutmeg
2 tablespoons butter, melted
8. Octopus Bread Bowls

1 package frozen dinner rolls
Melted butter
Black olives
Cream cheese
Melted butter
Black olives
Cream cheese
9. Pumpkin Beer Bread Recipe

3 cups flour
1 Tbsp. baking powder
2 tsp. pumpkin pie spice
1 tsp. salt
3 Tbsp. honey
1 cup pumpkin puree
1 12-ounce bottle of beer
1 Tbsp. baking powder
2 tsp. pumpkin pie spice
1 tsp. salt
3 Tbsp. honey
1 cup pumpkin puree
1 12-ounce bottle of beer
10. Brown Butter Banana Bread

6 ounces unsalted butter, melted and browned to just over 1/2 cup of butter
2 cups all-purpose flour
3/4 cup brown sugar
1 teaspoon baking soda
1/2 teaspoon salt
3/4 teaspoon ground cinnamon
2 large eggs
1 teaspoon pure vanilla extract
2 tablespoons rum, plus more for topping
1/4 cup buttermilk
1 1/4 cup mashed banana (from about 3 medium bananas)
1/2 cup toasted coconut, plus 1/4 cup untoasted coconut for topping
Top 10 Homemade Pizza Recipes
Even though pizza is often our go-to takeout meal, it can also make a really fun homemade dinner! The best part about making pizza is that everyone in the family can get involved. Even your toddler will love to push the dough down onto the pan and maybe throw on some cheese (if you’re feeling brave enough about cleaning up the mess afterward). Homemade pizza is also a much healthier alternative to the stuff you get delivered, too. So here’s a list of our top 10 favorite pizza recipes. Feel free to change it up, add new toppings and sauces, though. That’s half the fun!
1. Basic Cheese Pizza

1 cup lukewarm water
1/4 ounce dry yeast
1 teaspoon sugar
3 cups bread flour
1/2 teaspoon salt
1 tablespoon olive oil
1/2 cup tomato puree
2 tablespoons tomato paste
1 garlic clove, minced
1 tablespoon fresh basil, chopped
4 ounces Fresh mozzarella cheese(grilled and sliced)
1/4 ounce dry yeast
1 teaspoon sugar
3 cups bread flour
1/2 teaspoon salt
1 tablespoon olive oil
1/2 cup tomato puree
2 tablespoons tomato paste
1 garlic clove, minced
1 tablespoon fresh basil, chopped
4 ounces Fresh mozzarella cheese(grilled and sliced)
2. Mexican Black Bean Pizza

1 1/4 cups shredded Mexican Blend cheese
1/4 cup shredded Monterey Jack cheese
2 tablespoons olive oil
8 (6-inch) flour tortillas
1 small onion, chopped
1 (15 ounce) can BUSH’S® Black Beans, drained
1/2 cup salsa, mild or spicy
2 ounces canned chopped green chiles
2 ounces pulled chicken
1/4 cup shredded Monterey Jack cheese
2 tablespoons olive oil
8 (6-inch) flour tortillas
1 small onion, chopped
1 (15 ounce) can BUSH’S® Black Beans, drained
1/2 cup salsa, mild or spicy
2 ounces canned chopped green chiles
2 ounces pulled chicken
3. Spider Pizzas

1 lb pizza dough
¼ cup prepared pesto
1 cup shredded mozzarella
14-16 pepperoni slices
2 black olive slices
8 slices precooked bacon
¼ cup prepared pesto
1 cup shredded mozzarella
14-16 pepperoni slices
2 black olive slices
8 slices precooked bacon
4. BBQ Chicken, Broccoli, and Red Onion Pizza

One pound of boneless, skinless chicken breasts
One packet of McCormick Grill Mates Mesquite Marinade
3 tablespoons extra virgin olive oil
One gallon sized plastic bag
2 cups of fresh broccoli florets, chopped into bite-sized pieces and steamed
One small red onion, diced
One teaspoon of extra virgin olive oil
One 12×12″ piece of foil
About 1/4 cup of your favorite BBQ sauce, divided
1/4 pound of mild cheddar cheese, freshly grated (about 1 1/2 cups)
One, 6.5 oz package of pizza crust mix
Cookie sheet or some kind of pan that you can use on your grill
One tablespoon of extra virgin olive oil (to oil pan)
5. Bacon & Asparagus Breakfast Pizza
 1- 14 ounce Boboli Pizza Crust (or homemade if you prefer)
1/4 cup shredded parmesan cheese
1 cup shredded cheddar cheese
4 strips of bacon, fried and chopped into bite sized pieces
3 asparagus stalks, thinly sliced
3 large eggs
1/2 tablespoon fresh parsley, chopped
1/2 tablespoon fresh dill, chopped
1 green onion, thinly sliced
salt and pepper
extra shredded parmesan for topping
6. Chicken Alfredo Pizza

1 lb pizza dough, store-bought or homemade
1 1/2 cups cooked or grilled, shredded chicken
2 Tbsp butter
1/4 tsp garlic powder
1/8 tsp onion powder
1 Tbsp flour, plus more for dusting
1/2 cup + 2 Tbsp heavy cream
1/2 cup + 2 Tbsp whole milk
2 oz finely shredded Parmesan cheese (1/2 cup)
Salt and freshly ground black or white pepper, to taste
cornmeal, for dusting
4 oz shredded Mozzarella cheese (1 cup)
6 slices bacon, cooked and chopped
1 Tbsp extra virgin olive oil
1 1/2 Tbsp chopped green onions
7. Zucchini-Pesto Pizza

1 teaspoon(s) olive oil
1 large (12-inch) prebaked thin pizza crust
2 small tomatoes, seeded and sliced
1/4 teaspoon(s) salt
1/2 cup(s) refrigerated pesto
8 ounce(s) zucchini and summer squash, thinly sliced
2 teaspoon(s) olive oil
1/3 cup(s) grated Pecorino cheese
1/4 teaspoon(s) pepper
1 small lemon, grated zest only
1/4 cup(s) packed fresh mint leaves, chopped
8. White Pizza
 1 store bought pizza dough – or pick one up from your favorite pizzeria
Extra- virgin olive oil, for drizzling
2 cups whole or part skim ricotta
2 cloves garlic, finely chopped
Handful flat-leaf parsley, finely chopped
2 cups shredded mozzarella or provolone, 1 pouch
10 fresh basil leaves, 1/2 cup, shredded
9. Spinach Artichoke Pizza

1 loaf(s) (about 12 ounces) soft French or Italian bread
2 tablespoon(s) olive oil
1 1/4 cup(s) shredded part-skim mozzarella cheese
1 package(s) (10-ounce) frozen chopped spinach, thawed and squeezed dry
8 ounce(s) reduced-fat cream cheese (Neufchâtel), softened
1/3 cup(s) fat-free Greek yogurt, or light sour cream
1/3 cup(s) grated Parmesan cheese
2 clove(s) garlic, crushed with press
1 package(s) (9-ounce) frozen artichokes, thawed, patted dry, and chopped
1 lemon
Snipped chives, for garnish
10. Banana Split Brownie Dessert Pizza
 1 (20-ounce) box fudge brownie mix (recommended: Duncan Hines)
1 (8-ounce) package cream cheese, softened
1 (8-ounce) can crushed pineapple, drained
2 tablespoons sugar
2 banana, sliced
1 cup fresh strawberries sliced
Marshmallows
Maraschino cherries
1 cup chopped nuts
Coconut
Chocolate syrup, for drizzling
Whipped cream
Mint, for garnish
Homemade Pantry Recipe ~ Vegetable Stock
Homemade Vegetable Stock:

The first step in making vegetable stock is to start saving scraps of vegetables. Using a large zip lock freezer bag that you keep in the freezer, add all of the trimmings and peels from your vegetables instead of throwing them into the trash. Just make sure you clean your vegetables before you start peeling…just imagine trying to clean carrot peels!
Here are some ideas of vegetables that can go into your bag:
- onions (skins and outer layers)
- garlic (trimmings, skin and dried up cloves)
- green onions
- carrots (peelings and ends)
- broccoli stems
- mushroom stems
- sweet potato peels
- celery
- fresh herbs
Don’t be afraid to toss in any vegetable that doesn’t have a really strong flavor or would discolor the stock. I would avoid green pepper and beets for these reasons. Use what you like…I’ve included squash, eggplant and brussels sprouts in my stocks before. I also toss in all of those vegetables that would otherwise end up in the trash in the few days.
I highly recommend going heavy on onion. It gives your stock a nice onion soup color and deep flavor.

When the freezer bag is full, dump the contents into a large stock pot and fill it up with water.
Add some seasonings. I usually add a tablespoon of whole peppercorns and a couple of bay leaves. I don’t normally add salt since it will get added later in the final recipes and it’s always easy to add more later.
If you have favorite herbs, feel free to add them to the pot too. Or don’t. The vegetables really offer enough flavor.
Bring the stock to a boil and then turn it down to a simmer. Let everything simmer for a couple of hours. I’ve never done this in a crock pot, but I’m sure you could do this in the slow cooker on LOW for 6-8 hours.
When everything is soft and the water is the color of onion soup, put a strainer in a large bowl or another large pot. Pour the stock through the strainer and discard all of the vegetables.

The next step is to freeze the stock so it will last for months. You’ll want to freeze the stock in small portions so you can pull out just what you need. I’ve found that muffin tins give you about a 1/2 cup portion and ice cube trays make roughly 1/4 cup cubes.
I bought a silicon muffin tin since it is really easy to pop out the frozen stock. My red muffin tin has a metal rack that it sits on for support in the oven, but my current freezer doesn’t have a compartment big enough to hold it on the rack. So, I put the muffin tin in the bottom of the freezer before filling it and then use a measuring cup to fill the tins…or just carefully pour the stock directly from a large bowl.


After freezing overnight, the stock is ready for storing.
Since I only have space for one muffin tin in my freezer, I also freeze some of the stock into ice cube trays.

Toss everything into a new freezer bag (the old one goes back in the freezer to start saving scraps for the next batch). The next time you are cooking soup or risotto, just pull out your best guess at how much you will need, then heat it in a small pot or in the microwave until melted.

Now that I have a freezer full of stock, I could use some new recipes to use it up.
Homemade Skinless Chicken Longganisa''
Serves 4 to 6
Prep Time 20 minutes
Cooking Time 10 minutes
Prep Time 20 minutes
Cooking Time 10 minutes
For the marinade
1/2 cup brown sugar
4 tablespoons Worcestershire sauce
4 teaspoons fine salt
2 tablespoons liquid seasoning
1 tablespoon hot sauce
1 tablespoon garlic, minced
1 teaspoon freshly cracked black peppercorns
1 kilo ground chicken
200 grams ground pork fat
vegetable oil for frying
garlic rice and scrambled eggs, to serve (optional)
1 Make the marinade: In a large bowl, mix together all ingredients.
2 Add ground chicken and pork fat; mix thoroughly by hand. Form into thin logs and wrap each sausage in wax paper if desired. Marinate in the refrigerator for 3 hours or overnight. Drain marinade, place sausages in a covered container, and store in the freezer until ready to cook.
3 When ready to cook, thaw sausages. Heat about 1 tablespoon oil in a frying pan. Fry a few sausages at a time for 6 to 8 minutes or until sausages are cooked through. Serve with garlic rice and scrambled eggs, if desired.'

Badusha Sweet:
Hy Friends,
Today, I am coming with a special Sweet Badhusha. This is my daughter Aish’s favorite sweet. We prepared this sweet as a part of the menu for my daughter’s Birthday last week.
My Mil is excellent in preparing this delicacy and this time I Iearned the recipe from her. It is pretty easy to make. It tasted so delicious and had just the right amount of sweetness with lovely layers inside.

Here is the recipe for the deliciously flaky and layered Indian sweet Badusha…enjoy..:)
Ingredients:
· All purpose flour / Maida flour - 1 cup
· Baking pwd - ½ tsp
· Cooking soda - ¼ tsp
· Butter - 1 tbsp
· Milk - ¾ cup
· Sugar - ¾ cup
· Water - ¼ cup
· Cardamom pwd - a pinch
· Rose essence - few drops
· Lemon juice - ½ tsp
· Oil to fry
Method:

1. In a mixing bowl, add all purpose flour.
2. Add baking pwd and cooking soda.
3. Mix well.
4. Add butter and combine.

5. Add milk and knead it to fine, fluffy and soft dough.

6. Keep it covered with a damp cloth for 30 mins.

7. Meanwhile, lets prepare sugar syrup.
8. Take sugar in a bowl.
9. Keep ½ tsp of fresh lemon juice ready.
10. Add water, cardamom pwd, rose essence and allow to heat.

11. Continue stirring in low flame for 2 to 3 mins.

12. You can see it comes to one string consistency.
13. Now turn off the flame and add ½ tsp of lemon juice. ( this helps to avoid crystallization of sugar syrup )
14. Keep the sugar syrup aside.

15. Divide the dough to small lemon sized balls.
16. Pat it flat, gently with the finger and make small dent at the centre and set aside.

17. Heat oil in a frypan / kadai.
18. Once the oil is hot, keep the flame in simmer.
19. Add the badushas to the hot oil.

20. Fry in low flame ( its very important, the flame should be in simmer only, else the outer layer will turn brown with inner dough remaining uncooked )

21. Once it is completely cooked and turns crispy, drain from oil.

22. Soak them in the sugar syrup.
23. Allow them to get soaked for 10 mins.
24. Now remove it from the sugar syrup and arrange in a plate.

25. Wait till the shiny texture of sugary coat dries up.
26. Soft and flaky layered homemade Badushas ready.
27. Garnish with chopped nuts and saffron strands ( optional )
28. Enjoy..:)

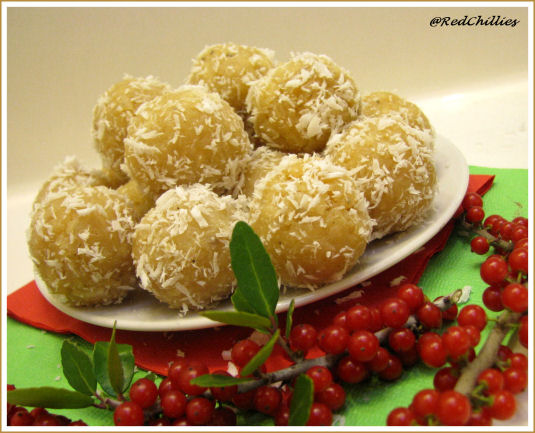
Milkmaid Laddoo/ Coconut Ladoo'
Ingredients
- 2 ½ cup shredded coconut (fresh/frozen)
- 1 cup sweetened condensed milk [Use milkmaid]
- ½ tsp cardamom powder
- ½ cup coconut for garnishing/rolling the laddoo

Method:
- Heat a heavy bottom flat pan (preferrable non-stick) on low flame. Add the shredded coconut first and gently stir it for about a minute. This is to remove any kind of moisture from the coconut and also to bring out its nutty flavor. Be very careful as it gets burnt very fast. The coconut should have a very pale brown color; the aroma from coconut is heavenly.
- Next add the condensed milk and stir. Make sure that the coconut mixture does not get stuck to the bottom.
- Depending on the quantity it takes about 20-25 minutes to thicken up. Add the cardamom powder at this stage and mix well.
- The mixture also thickens up after it is cooled. After it is sufficiently cooled, taken small pieces and roll into balls.
- Garnish or roll this over the remaining coconut shredding. This makes about 10-15 medium sized laddos
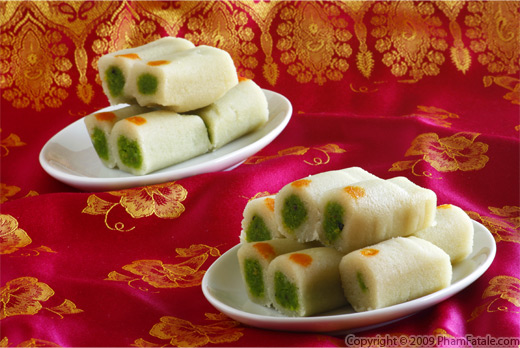
Kaju Pista Rolls (Indian Cashew and Pistachio Sweets)

Ingredients
Yields: 1 dozen2 cups cashew nuts, unsalted
1 cup pistachio kernels, unsalted, unshelled
1 1/2 cup whole milk, + 1 Tbs for the saffron
3 drops green food coloring
1 1/4 cup powdered sugar, or more to taste
1 1/2 Tbs light corn syrup
3 Tbs ghee, or homemade clarified butter
2 cardamom pods, unshelled
2 drops cardamom extract, optional
1/4 tsp saffron threads, for decoration, optional
Yields: 1 dozen
2 cups cashew nuts, unsalted1 cup pistachio kernels, unsalted, unshelled
1 1/2 cup whole milk, + 1 Tbs for the saffron
3 drops green food coloring
1 1/4 cup powdered sugar, or more to taste
1 1/2 Tbs light corn syrup
3 Tbs ghee, or homemade clarified butter
2 cardamom pods, unshelled
2 drops cardamom extract, optional
1/4 tsp saffron threads, for decoration, optional
Directions
Remove the seeds from the cardamom pods. Gather all the seeds in a mortar and pestle and grind to a fine powder. Set aside.In 2 different bowls. Soak the cashew nuts and pistachio kernels in warm water. Let the nuts sit in a warm area for about 2-3 hours. During this period of time, change the water about 3 to 4 times with new warm water. Drain the nuts separately and set aside in 2 other bowls.
Coat 2 silicone baking mats with a thin layer of ghee. Set aside.
Reserve 1 cup of milk for the drained cashews and 1/2 cup of milk for the drained pistachios.
For the cashew nut barfi: Blend the cashews first into a fine paste. If the cashews don't blend easily, add as little milk as possible (from the 1 cup previously mentionned) to get it to blend.
In a medium nonstick saucepan, add a tablespoon of corn syrup, 3/4 cup of powdered sugar and the rest of milk (meant for the cashews). Bring to a boil, then lower the heat of the stove immediately to a medium low. The liquid should be syrup-y. Add the cashew paste. Stir the paste constantly to prevent the mixture from burning. Cook the cashew paste for about 6 to 9 minutes. The mixture should be much thicker and form a single solid mass. It will still be very soft and pliable. Add 1/2 of the amount of cardamom powder, a drop of cardamom extract and 2 teapoons of ghee. Mix well. Transfer to one of the 2 ghee-greasedsilicone baking mats. Let the paste cool a bit (about 15-20 minutes) while you're making the same procedure with the pistachios.
For the pistachio barfi: Blend the pistachios into a fine paste. If the pistachios don't blend easily, add as little milk as possible (from the 1/2 cup previously mentionned).
In a small nonstick saucepan, add 1/2 tablespoon of corn syrup, the rest of the powdered sugar and the rest of milk (meant for the pistachios). Bring to a boil, then lower the heat of the stove immediately to a medium low. Add the pistachio paste. Stir the paste constantly to prevent the mixture from burning. Cook the pistachio paste for about 6 to 9 minutes. The mixture should be much thicker and form a single solid mass. It will still be very soft and pliable. Add the remaining cardamom powder, a drop of cardamom extract, food coloring and 1 teaspoon of ghee. Mix well. Transfer to the other ghee-greased silicone baking mats. Let the paste cool a bit (about 15 minutes)
Assembly: Divide the cashew paste into 2 or 3 balls. Cover the cashew paste with another mat or plastic wrap, then roll the cashew paste with a rolling pin to about a 1/8-inch thick layer and cut the layer into 4-inch wide rectangles. Cover the paste with a humid cloth to prevent the paste from drying.
Divide the pistachio paste into 2 or 3 balls as well. Create 2 or 3 1/4-inch diameter cylinders. Cover the cylinders with a humid cloth to prevent the paste from drying.
Insert a pistachio cylinder into each cashew rectangle. Roll the dough tightly so that the cashew paste completely wraps the pistachio filling entirely. Repeat with other balls of nut paste. Cut the rolls into 1-inch cylinder using a paring knife.
Place the saffron in a mortar and pestle. Grind the saffron into a powder. Add a tablespoon of milk. Decorate each kaju pista roll with a dot of saffron liquid using a Q-tip cotton swab.
You can store them in rectangular-shaped airtight-container then refrigerate them for a week.
Arrange them layer by layer, between waxed paper if you're afraid they stick to each other. Serve with hot tea.
Enjoy!
Tips
Kaju pista roll can also be sticky-rice-ball shaped as well. Just make sure a little amount of pistachio marzipan is peeking out at the top of the mount.
You can also create 3 layers (with the pistachio layer in the middle), then cut into diamond shapes.
I love the Vitamix blender. The dry blade really turns the nut into a smooth nut butter. It's well worth it if you cook a lot or if you're asmoothie drinker.
If the green food coloring is too intense, either lower the amount to 3 drops or add a drop of yellow food coloring.
The addition of the cardamom extract is optional. I get from my Indian local market. It's called Elaichi in Hindi, so you might want to search for Elaichi extract. It's very convenient and brings that little oomph to your drinks and desserts like Masala Chai, Sharbat or Kheer.
Per David Lebovitz's advice, to make a smoother more spreadable product, add a tablespoon of light corn syrup to the sugar for the marshmallow frosting. I made the same application to my homemadecaramel sauce and my marshmallow banana frosting.
You can also decorate the kaju pista rolls with a little silver foil as well. Just press a little silver piece of foil using a toothpick. I didn't have any on hand though. You can find silver leaves or gold leaves for decoration in fine specialty stores or in Indian stores, it's called Varak.
You can mix-match any kind of nuts like almond, walnut or hazelnut with your own flavoring like mango extract, rose water, kewra water, orange blossom water or even finish by dipping the rolls in chocolate or by coating them with coconut flakes. Be creative!
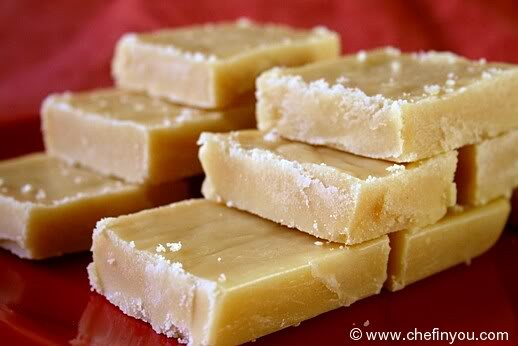
Mysore Pak (Soft)
Basic Information
Prep Time: Under 15 min
Cook Time: Under 15 min
Serves: 8+ people
Yield: About 15 med-large pieces
Ingredients
- 1-1/2 cups Gram flour (Besan), sifted
- 1 cup Ghee (we used solidified)
- 1 cup Olive oil (light. NOT Extra Virgin). or use all ghee
- 2 cups sugar
- 1/2 cup water
Method
1
Heat the oil and ghee together.
 Recipe | Indian Sweet Recipes")
2
In another pan or vessel take the sifted gram flour(besan)
 Recipe | Indian Sweet Recipes")
3
Now add few tablespoons of the hot ghee to the flour.
 Recipe | Indian Sweet Recipes")
4
Just about 1-2 tbsp enough to mix it a little so that it forms into crumbs. This process is done so that it prevents the flour forming lumps while you add it to the sugar syrup mixture.NOTE You are not roasting the flour here. I know the pan on the stove is misleading but my mother is only pouring the ghee on the flour and mixing it to form crumbs. You can do this on the side on a plate too.
 Recipe | Indian Sweet Recipes")
5
Now soft this flour well.
 Recipe | Indian Sweet Recipes")
6
Meanwhile mix the water and sugar together in a heavy pan.
 Recipe | Indian Sweet Recipes")
7
Let it come to a boil and keep it going until you get a one thread consistency. ( The candy thermometer would show 220º F - 222º F)
 Recipe | Indian Sweet Recipes")
8
This is where you need more than one hands (surely not a great situation when you want to take photos). Keep stirring the pan while you sprinkle the flour evenly all over the syrup's surface. (Please give a warm welcome to my mom's hands at Chef In You ;)) Note: Please get used to the word "stirring" cos from this point on to almost the end of the post I am going to be using this term repeatedly to the point of boredom. But I hope to be excused cos this action is EXTREMELY IMPORTANT for the well being of Mysore Pak as well as the consumer later on :)
 Recipe | Indian Sweet Recipes")
9
Once all the flour is in and well stirred this is how it will start looking. Mind you - you are still going to keep stirring. Tips : At this point keep the flame to Low-Medium heat. This is to make sure that the flour does not turn red very soon. Also make sure that the ghee mixture on the side is Med-High flame. You want to keep it at that temperature (so keep the flame going for ghee)
 Recipe | Indian Sweet Recipes")
10
Take a ladle of ghee mixture and pour it evenly on the flour surface at the same time keeping the stirring going. The minute you add the hot ghee to the flour, it will froth up like the picture below. Yes, dont worry - we need that :).
 Recipe | Indian Sweet Recipes")
11
Continue stirring
 Recipe | Indian Sweet Recipes")
12
When you see the flour absorbing the ghee and starts becoming thick (which will be in just few seconds), pour another ladle of ghee. It will froth up again,
 Recipe | Indian Sweet Recipes")
13
wait for few seconds till it starts to look like its thickening slightly,
 Recipe | Indian Sweet Recipes")
14
add more ghee.
 Recipe | Indian Sweet Recipes")
15
Keep stirring.
 Recipe | Indian Sweet Recipes")
16
Keep repeating this process and you will soon see that the mixture keeps getting thick and also changes color from bright yellow to brownish yellow. At this point you will also be hit with a amazing aroma of Mysore Pa. The deepening of color is dependent on the flame. If kept high, it will turn deep red (or deep brownish red)
 Recipe | Indian Sweet Recipes")
17
Also the flour mixture should start leaving the sides. The stirring action will show that the flour mixture starts moving more easily without sticking to the sides or bottom. As you can see below, the bottom of the pan is seen more clearly than it did before.
 Recipe | Indian Sweet Recipes")
18
If you stop stirring for a second, you will also find the mixture rising up with lots of frothing action that it actually starts looking more like the surface of a bubbling molten lava !!.( Sorry I couldn't come up with any other appetizing word. I think its the closest thing to describing how it looks ) Tip: You can try one trick which my mother insists works more often than not, to find out the correct "padham" or "doneness". While stirring, quickly put a drop of the flour mixture on a plate. You should be able to shape the mixture into a small ball that is soft in consistency. Warning: Make sure that you do this all fast cos the sweet goes from not done todone to overdone in matter of milli seconds.
 Recipe | Indian Sweet Recipes")
19
Keep stirring once again - the mixture should now move more freely, will be very aromatic, becomes thick - sort of comes together into a floaty mass and the bottom of the pan is seen more clearly. Tip: When you run the spatula through the middle of the mixture in a straight line, it should part leaving a clear trail. The best example I can think of right now would be like how Moses parted the red sea (!!) - See [ IMAGE ]. Of course it wont stay that way until the followers can pass through!!! But you get the idea. Once you can do that, you know its time for the next step.
 Recipe | Indian Sweet Recipes")
20
Take a well greased plate or pan and pour the hot mixture into it.
 Recipe | Indian Sweet Recipes")
21
Pat the Pan on the surface couple of times to make sure that the mixture spreads evenly on all sides. Let it sit for some time to cool down a little. You don't want to cool it down all the way. You just want to cool it down until it hardens up a little. This is because you need it to be still soft enough to cut it into shapes. Otherwise it will be too hard to do it properly.
 Recipe | Indian Sweet Recipes")
22
Once set, cut them into desirable shapes. We did a simple square.
 Recipe | Indian Sweet Recipes")
23
Now cool it completely and then slowly using a knife, remove the pieces.
 Recipe | Indian Sweet Recipes")
Yummy, melt-in-the-mouth Mysore Pa all ready to be devoured. If you can stop eating them enough to have leftovers, then store them at room temperature in a zip lock bag or in a regular container. It keeps well for a long time. Recipe | Indian Sweet Recipes")
Karachi Halwa

Ingredients:
• 2 Cups soaked rava
• 1 Cup ghee
• 1 1/2 Cup sugar
• 1/4 Cup cashew nuts
• 1/4 Cup walnuts
• 2 tsp Cardamom powder
• 2 tsp Essence
• 4 tbsp Water
• 2 Cups soaked rava
• 1 Cup ghee
• 1 1/2 Cup sugar
• 1/4 Cup cashew nuts
• 1/4 Cup walnuts
• 2 tsp Cardamom powder
• 2 tsp Essence
• 4 tbsp Water
Method:
• Put 4 tbsp ghee in microwave for few seconds.
• Mix cashew nuts and walnuts.
• Microwave this mixture for 5 minutes.
• Separate cashew nuts and keep it for few minutes.
• Add sugar and 4 tbsp water to the ghee.
• Microwave it for 2 minutes and stir it.
• Mix rava, cardamom powder and more ghee.
• Microwave this mixture for 3 seconds on high temperature.
• Add essence and dry fruits.
• Karachi Halva is ready.'
 Ingredients
* 2 tablespoons olive oil
* 1 large yellow onion, chopped
* 1 red or green bell pepper, cored, seeded, and diced
* 3 chipotle peppers in adobo sauce, minced
* 4 garlic cloves, minced
* 1 pound ground round or ground chuck, browned and drained
* 2 to 3 tablespoons chili powder
* 1 to 2 teaspoons sea salt
* 2 to 3 teaspoons ground cumin
* 1 teaspoon freshly ground black pepper
* 1/4 teaspoon dried basil
* 1/4 cup Worcestershire sauce
* 1 (28-ounce) can diced tomatoes
* 2 tablespoons tomato paste
* 2 (14-ounce) cans chicken or beef broth
* 1 bay leaf
* 1 (15-ounce) can pinto beans, rinsed and drained
* 1 (15-ounce) can kidney beans, rinsed and drained
* Garnishes: grated Cheddar cheese, sour cream
Method:
Heat oil in a large heavy saucepan or Dutch oven over medium heat; add onion.
Reduce heat to low, and cook, stirring occasionally, 10 minutes or until tender.
Add bell pepper, and cook 5 minutes.
Add chipotle pepper and garlic; cook about 1 minute.
Add chicken and next 5 ingredients and simmer about 2 minutes.
Stir in Worcestershire sauce and next 4 ingredients. Bring to a low boil, and reduce heat to low. Simmer, uncovered, 30 minutes.
Add beans, stir, and continue to simmer 10 minutes or until liquid has reduced slightly.
Remove bay leaf. Garnish, if desired.
Homemade Farmer's Cheese: 2 Recipes
It is hard to find farmer's cheese at the store, and when you do, you will pay an arm and a leg for it. There are a couple of different ways to make farmer's cheese at home. Recipe number one is super-speedy. The cheese comes out very mild. Recipe number two takes a couple of days to complete, and the result is cheese that is slightly salty and has a bit of a "bite" to it.
 What to make with this cheese? How about cheesecake? Or Syrniki (Russian Cheese Pancakes)?
Recipe 1: Easy-Peasy Farmer's Cheese
What you need:
1/2 gallon of milk
Cheesecloth
Pour milk in a pot and heat over slow heat until it is just about to boil.

Let cool and add 3 tablespoons of vinegar.
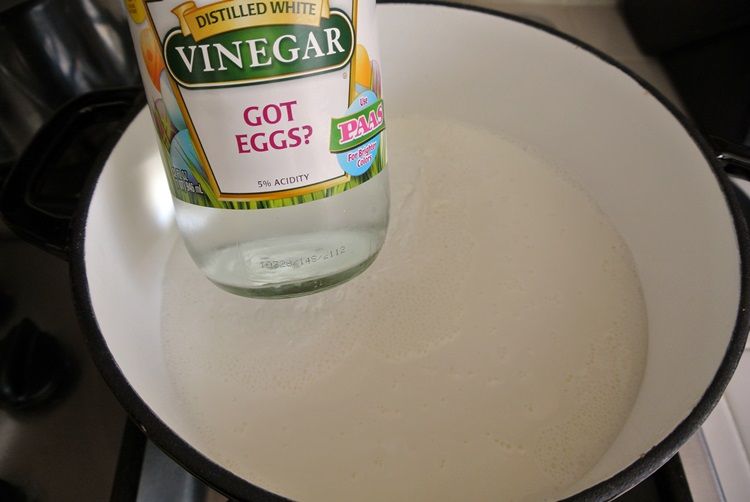
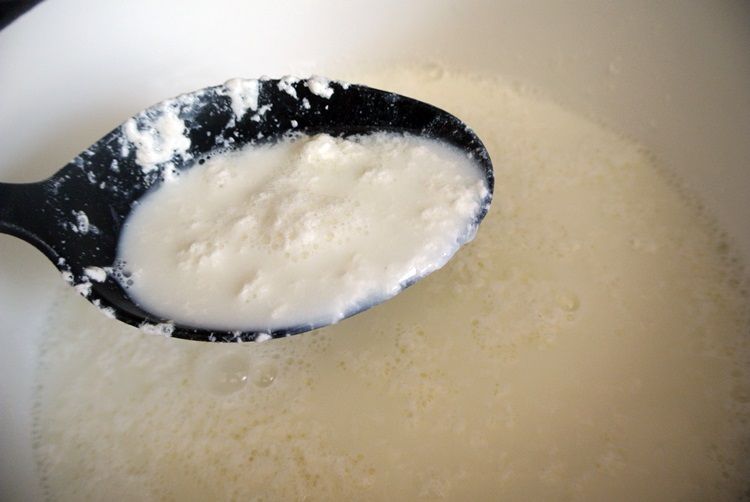
You will see milk start separating into curd and whey.

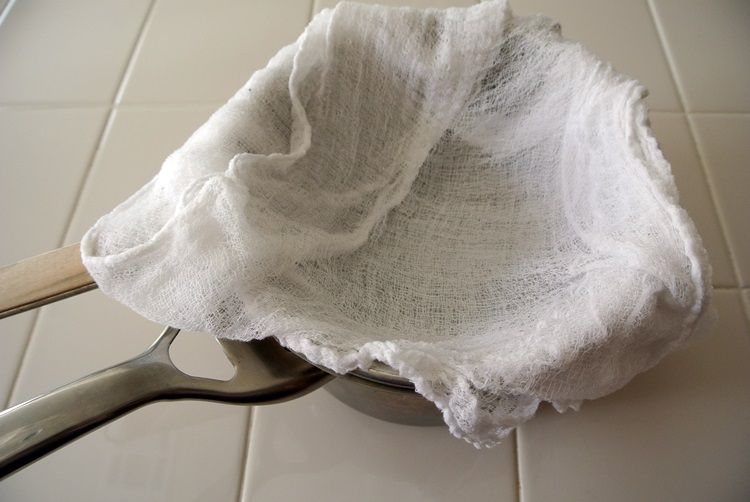
Spread cheesecloth over a fine-mesh sieve which has been placed in a pot. This is needed to drain the whey from the cheese.
Pour the whole thing into the cheese cloth.
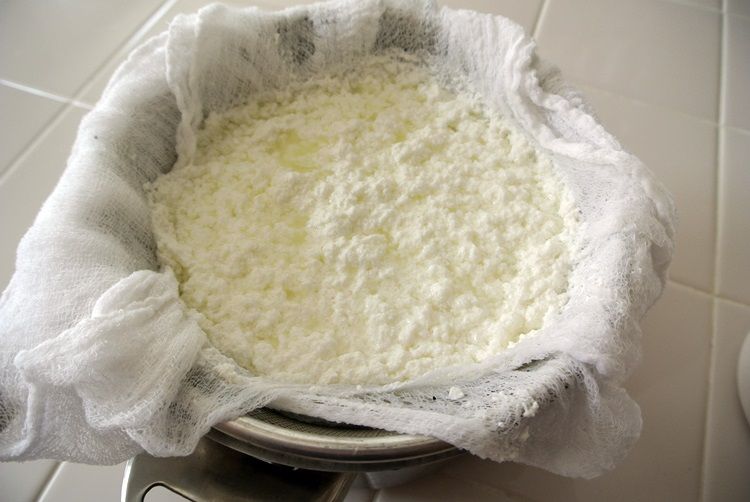
Lift the cheese cloth and squeeze gently.

Loosely tie the cheesecloth and leave in the sieve overnight. Make sure you place it in the refrigerator.

Save the whey to make bread. If you are not planning on making bread any time soon, you can freeze it.


Recipe 2: Wait for it... Farmer's Cheese
What you need:
1/2 gallon milk
1 quart buttermilk
Cheesecloth
Combine milk and buttermilk in a pot. Slowly heat but do not let it boil.
Leave covered for 24 hours at room temperature. You will see the whey separating from the curd.
Slowly heat again but do not let boil.
Leave covered for 24 hours at room temperature.
Slowly heat again but do not let boil. Let cool completely and pour into a cheesecloth over a sieve, which has been placed in a pot.
Lift the cheese cloth and squeeze gently.
Loosely tie the cheesecloth and leave in the sieve overnight. Make sure you place it in the refrigerator.
Your total time to make this cheese is two days.

Recipe 1: Easy-Peasy Farmer's Cheese
What you need:
1/2 gallon of milk
Cheesecloth
Pour milk in a pot and heat over slow heat until it is just about to boil.
Let cool and add 3 tablespoons of vinegar.
You will see milk start separating into curd and whey.
Spread cheesecloth over a fine-mesh sieve which has been placed in a pot. This is needed to drain the whey from the cheese.
Pour the whole thing into the cheese cloth.
Lift the cheese cloth and squeeze gently.
Loosely tie the cheesecloth and leave in the sieve overnight. Make sure you place it in the refrigerator.
Save the whey to make bread. If you are not planning on making bread any time soon, you can freeze it.

Recipe 2: Wait for it... Farmer's Cheese
What you need:
1/2 gallon milk
1 quart buttermilk
Cheesecloth
Combine milk and buttermilk in a pot. Slowly heat but do not let it boil.
Leave covered for 24 hours at room temperature. You will see the whey separating from the curd.
Slowly heat again but do not let boil.
Leave covered for 24 hours at room temperature.
Slowly heat again but do not let boil. Let cool completely and pour into a cheesecloth over a sieve, which has been placed in a pot.
Lift the cheese cloth and squeeze gently.
Loosely tie the cheesecloth and leave in the sieve overnight. Make sure you place it in the refrigerator.
Your total time to make this cheese is two days.
Slow Cooker Lemon Curd
A few months ago I read this wonderful book by Jennifer Reese, Make the Bread, Buy the Butter. It's not just a cookbook but a collection of stories and anecdotes about ways to make your own food. Having read it cover to cover, I was truly inspired! In this book Jennifer talks about her experimentation and advises on what things are better (and easier) to make yourself or buy. In the section about lemon curd she advises to buy it because there is not an easy recipe for good lemon curd. She advises to spend $4-5 for a small jar of lemon curd. Respectfully, I disagree.

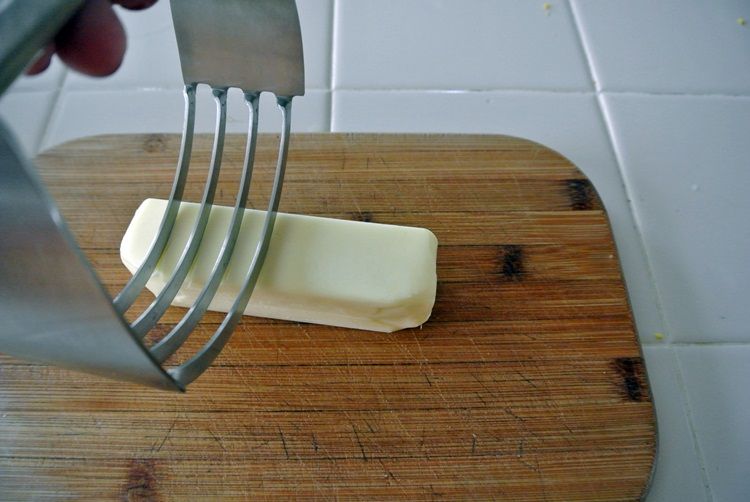
Cube the butter.
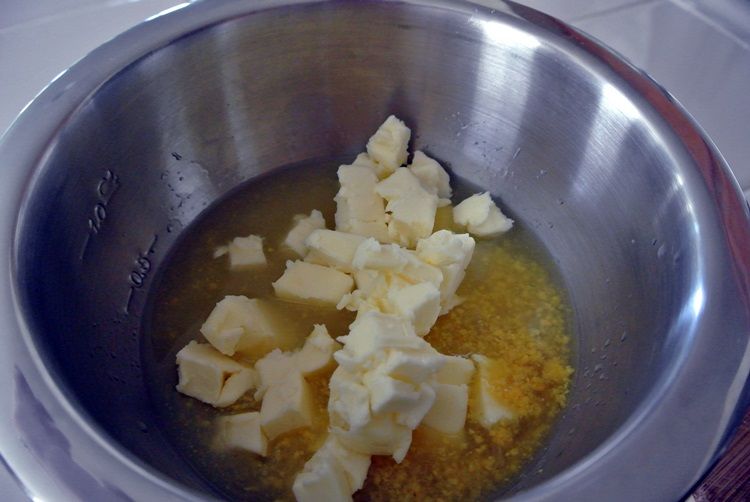
Combine lemon juice, lemon zest, sugar and butter in a heatproof bowl, which will fit in your slow cooker. However, if you have a mini slow cooker, just use any medium heatproof bowl.

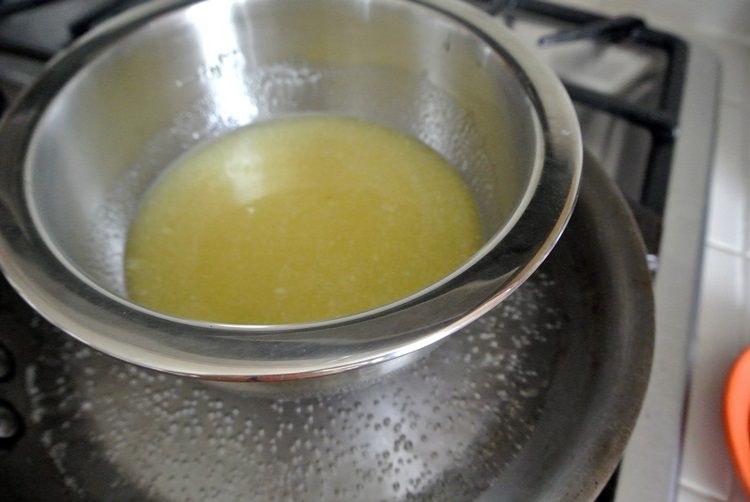
Pour 0.5 inch of water into a skillet and place the skillet on the stove. Place the bowl on the skillet. Turn on the heat and let the water boil. Stir the lemon juice mixture until butter melted. Remove from heat and allow to cool for a few minutes.
Turn the slow cooker on low.
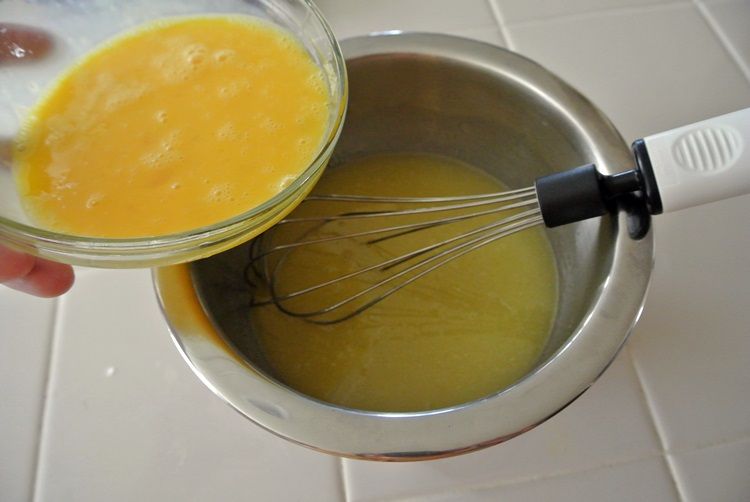
Whisk eggs and egg yolks with a fork. Pour into the lemon juice mixture, whisking well until combined.
Place the bowl in the slow cooker (or pour into the mini slow cooker) and cook for 1 to 2 hours, stirring every 15 minutes. Lemon curd should have the consistency of honey. It will thicken as it stands. Keep refrigerated.

Lemon Curd
Ingredients:
3 lemons, zested and juiced 1 cup sugar 1/2 cup (1 stick) butter 2 eggs 2 egg yolks
1. Cube butter.
2. Combine lemon juice, lemon zest, sugar and butter in a heatproof bowl, which will fit in your slow cooker. However, if you have a mini slow cooker, just use any medium heatproof bowl.
3. Pour 0.5 inch of water into a skillet and place the skillet on the stove. Place the bowl on the skillet. Turn on the heat and let the water boil. Stir the lemon juice mixture until butter melted. Remove from heat and allow to cool for a few minutes.
4. Turn the slow cooker on low. Whisk eggs and egg yolks with a fork. Pour into the lemon juice mixture, whisking well until combined.
5. Place the bowl in the slow cooker (or pour into the mini slow cooker) and cook for 1 to 2 hours, stirring every 15 minutes. Lemon curd should have the consistency of honey. It will thicken as it stands. Keep refrigerated.
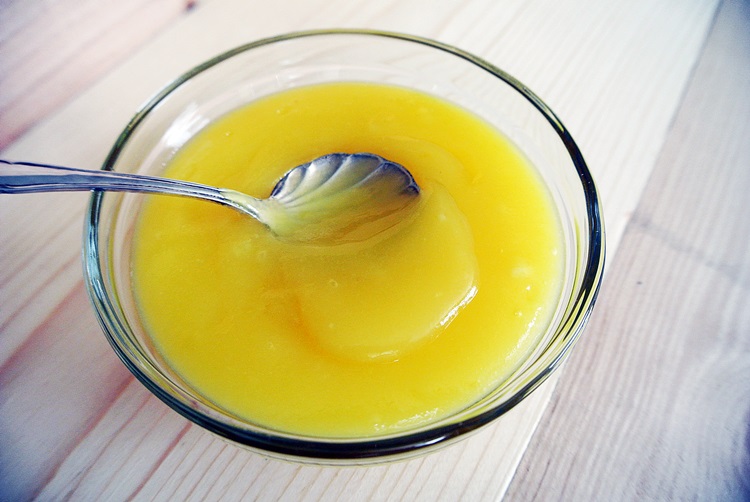
I found this recipe for lemon curd in Best Ever Recipes for Your Slow Cooker cookbook. It was so easy and ended up being amazing! I felt like I made sunshine and put it in a jar.
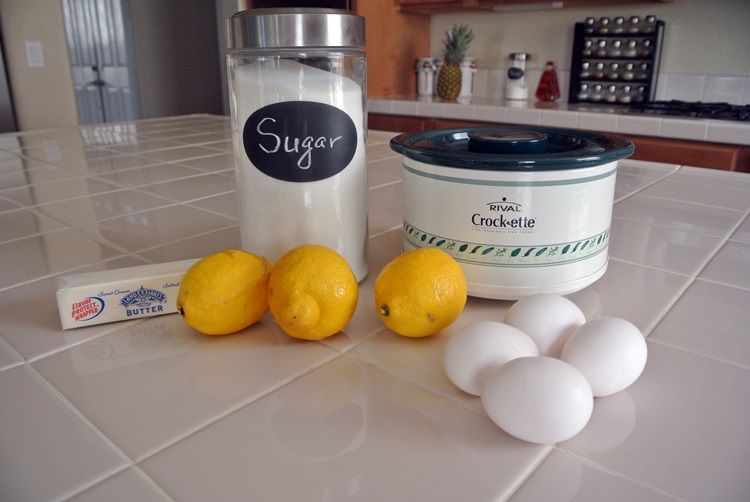
Here is what you need:
- 3 lemons, zested and juiced
- 1 cup sugar
- 1/2 cup (1 stick) butter
- 2 eggs
- 2 egg yolks
Cube the butter.
Combine lemon juice, lemon zest, sugar and butter in a heatproof bowl, which will fit in your slow cooker. However, if you have a mini slow cooker, just use any medium heatproof bowl.
Pour 0.5 inch of water into a skillet and place the skillet on the stove. Place the bowl on the skillet. Turn on the heat and let the water boil. Stir the lemon juice mixture until butter melted. Remove from heat and allow to cool for a few minutes.
Turn the slow cooker on low.
Whisk eggs and egg yolks with a fork. Pour into the lemon juice mixture, whisking well until combined.
Place the bowl in the slow cooker (or pour into the mini slow cooker) and cook for 1 to 2 hours, stirring every 15 minutes. Lemon curd should have the consistency of honey. It will thicken as it stands. Keep refrigerated.

Ingredients:
1. Cube butter.
2. Combine lemon juice, lemon zest, sugar and butter in a heatproof bowl, which will fit in your slow cooker. However, if you have a mini slow cooker, just use any medium heatproof bowl.
3. Pour 0.5 inch of water into a skillet and place the skillet on the stove. Place the bowl on the skillet. Turn on the heat and let the water boil. Stir the lemon juice mixture until butter melted. Remove from heat and allow to cool for a few minutes.
4. Turn the slow cooker on low. Whisk eggs and egg yolks with a fork. Pour into the lemon juice mixture, whisking well until combined.
5. Place the bowl in the slow cooker (or pour into the mini slow cooker) and cook for 1 to 2 hours, stirring every 15 minutes. Lemon curd should have the consistency of honey. It will thicken as it stands. Keep refrigerated.


